Introduction
Hey there! I'm creating this post as another part of my struggles with Proxmox, but also as a separate tutorial post. I'll try to present everything in a clear and simple way, but since I'm just starting to write blogs, don't expect any fireworks. I might miss something or not mention something, but I think I'll convey the main idea. If you haven't seen my previous posts, I encourage you to read them.
In this post, you'll learn how I managed to run Vaultwarden on a Linux machine, specifically on some Ubuntu or Debian.
Creating a Virtual Machine
Since I'm using Proxmox in this series, I'll create a virtual machine on it. However, if you're using a VPS or a regular server with a static IP, you can skip this step.
Configuring Machine Parameters and Network
To create a virtual machine, I'm using a script from Proxmox VE Helper-Scripts. I've modified it a bit so that when the machine is created, my "mini-function" runs, changing its network configuration. I did this because the Proxmox server has a wireless network card, which means bridges don't work, and I'm using macvlan.
The parameters of the machine that will run Docker with Vaultwarden are as follows:
ID: 104
vCPU: 2
RAM: 2GB
Disk: 5GB
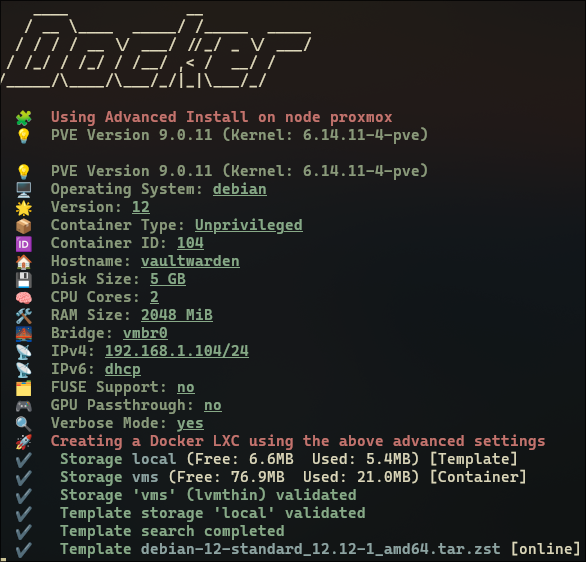
The configurator asked me if I wanted to install Docker Compose v2, which I agreed to. Then it asked if I wanted to install Portainer and the Portainer agent, which I declined.
Configuring the Container
After creating the virtual machine, I start creating the necessary folders and files to run the container.
I start by creating a folder:
mkdir ~/vaultwarden
cd ~/vaultwarden
mkdir vw-data
The vw-data folder will later contain the encrypted database, attachments, and Vaultwarden settings.
Next, I create a docker-compose.yml file and paste the following configuration:
services:
  vaultwarden:
    image: vaultwarden/server:1.34.3
    container_name: vaultwarden
    restart: always
    ports:
      - "80:80"    # Expose HTTP on host port 80
      - "3012:3012" # WebSocket notifications
    environment:
      # - WEBSOCKET_ENABLED=true # Disable WebSocket if not needed or if causing issues
      # Admin token will be added here later
      # ADMIN_TOKEN: 'YOUR_SECURE_ADMIN_TOKEN_HASH'
      # Set timezone (Important for logs and Fail2Ban)
      TZ: "Europe/Warsaw" # Adjust this to your time zone
    volumes:
      - ./vw-data:/data
      # Mounts for time zone (Important for correct log times -> Fail2Ban)
      - /etc/localtime:/etc/localtime:ro
      - /etc/timezone:/etc/timezone:ro
After saving the file, I run the container:
docker compose up -d
Configuring Reverse Proxy
Now, let's configure Nginx to access Vaultwarden through our domain and automatically obtain an SSL certificate.
Generating an SSL Certificate
First, I create a configuration file in /etc/nginx/sites-available/vault.conf:
server {
    listen 80;
    server_name vault.blonie.cloud;

    location / {
        proxy_pass http://192.168.1.100:2283;
        proxy_set_header Host $host;
        proxy_set_header X-Real-IP $remote_addr;
        proxy_set_header X-Forwarded-For $proxy_add_x_forwarded_for;
        proxy_set_header X-Forwarded-Proto $scheme;
    }

    # Let's Encrypt challenge location
    location /.well-known/acme-challenge/ {
        root /var/www/certbot;
    }
}
Then, I activate the site by running:
ln -s /etc/nginx/sites-available/vault.conf /etc/nginx/sites-enabled/
If this is the first domain on this reverse proxy, I create a folder for Certbot challenges:
mkdir -p /var/www/certbot
Once that's done, I check the configuration and restart Nginx:
nginx -t && systemctl reload nginx
Now it's time to generate an SSL certificate using Certbot. If this is your first time using Certbot or you're not sure how to create a reverse proxy, I refer you to this post where I show how to do it.
I run Certbot, which will connect to Let's Encrypt and expose temporary files in .well-known/acme-challenge on port 80:
certbot certonly --webroot -w /var/www/certbot -d vault.domena.pl
I go through the automated configuration from Certbot. If everything goes well, the certificate is saved to /etc/letsencrypt/live/vault.domena.pl/.
root@nginx-reverse-proxy:~# certbot certonly --webroot -w /var/www/certbot -d vault.blonie.cloud
Saving debug log to /var/log/letsencrypt/letsencrypt.log
Requesting a certificate for vault.blonie.cloud

Successfully received certificate.
Certificate is saved at: /etc/letsencrypt/live/vault.blonie.cloud/fullchain.pem
Key is saved at:         /etc/letsencrypt/live/vault.blonie.cloud/privkey.pem
This certificate expires on 2026-03-08.
These files will be updated when the certificate renews.
Certbot has set up a scheduled task to automatically renew this certificate in the background.

- - - - - - - - - - - - - - - - - - - - - - - - - - - - - - - - - - - - - - - -
If you like Certbot, please consider supporting our work by:
 * Donating to ISRG / Let's Encrypt:   https://letsencrypt.org/donate
 * Donating to EFF:                    https://eff.org/donate-le
- - - - - - - - - - - - - - - - - - - - - - - - - - - - - - - - - - - - - - - -
root@nginx-reverse-proxy:~#
After obtaining the certificate from Certbot, I enable SSL in Nginx:
vim /etc/nginx/sites-available/vault.conf
# /etc/nginx/sites-available/vault.conf
server {
    listen 80;
    server_name vault.blonie.cloud;
    return 301 https://$host$request_uri;
}

server {
    listen 443 ssl http2;
    server_name vault.blonie.cloud;

    ssl_certificate /etc/letsencrypt/live/vault.blonie.cloud/fullchain.pem;
    ssl_certificate_key /etc/letsencrypt/live/vault.blonie.cloud/privkey.pem;
    ssl_trusted_certificate /etc/letsencrypt/live/vault.blonie.cloud/chain.pem;

    ssl_protocols TLSv1.2 TLSv1.3;
    ssl_ciphers HIGH:!aNULL:!MD5;

    location / {
        proxy_pass http://192.168.1.104:80;
        proxy_set_header Host $host;
        proxy_set_header X-Real-IP $remote_addr;
        proxy_set_header X-Forwarded-For $proxy_add_x_forwarded_for;
        proxy_set_header X-Forwarded-Proto $scheme;
    }
}
CLASSICALLY, I test the configuration and reload Nginx:
nginx -t && systemctl reload nginx
Open a browser and go to https://vault.domena.pl. You should see the Vaultwarden page. Click "Create account", enter your details, and create your first user account.
You can now log in and use the password manager!
Securing the Admin Panel and Disabling Account Creation
By default, anyone can create an account on your Vaultwarden instance. We want to change this. To do so, we need access to the admin panel, which is available at https://vault.domena.pl/admin. It's protected by an admin token, which we need to generate first.
Generating the Admin Token
I use the argon2 tool to hash the admin password. First, I install it (example for Debian/Ubuntu):
sudo apt-get update && sudo apt-get install argon2
Now, I generate a hash for the admin password (replace YourSecureAdminPassword with your secret password). Remember to copy the entire result, starting from $$argon2id$$....:
echo -n 'YourSecureAdminPassword' | argon2 "$(openssl rand -base64 16)" -e -id -k 65536 -t 3 -p 4 | sed 's/\$/\$\$/g'
Add the ADMIN_TOKEN variable in the environment section or uncomment and paste the hash:
# ... (other services or settings)
services:
    vaultwarden:
        # ... (other Vaultwarden settings)
        environment:
            # ... (other environment variables, e.g., TZ)
            ADMIN_TOKEN: YOUR_COPIED_ARGON2_HASH # Paste the copied hash here
        # ... (rest of the configuration)
# ... (networks, etc.)
Save the file and run Vaultwarden again to apply the changes:
docker compose down && docker compose up -d
Disabling Registration
- Go to https://vault.domena.pl/admin.
- Enter your original admin password (the one you used in the
echocommand above, not the hash). - Go to "General Settings".
- Uncheck the "Allow new signups" option.
- Click "Save".
Now, try to create a new account (e.g., in a private browser window). You should see an error message indicating that registration is disabled.
In the admin panel, you can also configure SMTP settings for sending emails (useful for invitations or password resets) and manage users.
Summary
Congratulations! You've:
- Configured Vaultwarden with Docker Compose.
- Used a specific image tag and configured the container to run as a non-root user (optional).
- Configured Caddy as a reverse proxy with SSL and Real-IP header.
- Secured the admin area with a token and disabled public registration.
Your own, secure password manager is now running on your server! You can configure browser extensions and Bitwarden apps with the server URL (https://vault.domena.pl) and safely manage your passwords.
I hope this post helps you install Vaultwarden! Let me know if you have any questions or suggestions for additions.